howto

Managing Home Media

As companies start to decide that sometimes it is better for them to remove access to media that you have “purchased” — I thought it would be good to share how I manage my media at home.

This is a living document that I plan to update with more details and better techniques, as I find them. Since I am managing the organization of some of this media right now, I’m writing this down to both remind myself of how I do it, and perhaps share info that might be useful for others.

Legal disclaimer:

As various jurisdictions pass laws that restrict “authorized” use of the media that you may own, some of the discussed techniques may fall afoul of those laws. There are certainly arguments for “fair use” in backing up media for personal use, but please research and decide for yourself whether these techniques are something legal in your area and/or that you are comfortable with.

Technical disclaimer:

This article will recommend techniques for backup, organization, and providing private access to your collections that may require more technical expertise than you may currently have, and/or require more detail than I am able to currently provide in this document. You are welcome to ask questions in the comments, but I may not be able to answer all of them. Hopefully this article will give you a starting point for researching these technical details yourself and/or encourage you to reach out to a close technical friend for assistance.

That all said, if you have questions, comments, or suggestions for improvements to this post, I’d be happy to hear them in the comments!

Movies & TV

Physical media

DVDs! Blu-rays! If you have it in your physical possession, they can’t take it away.

Of course, some terrible disaster could befall your house and your belongings… like happened to me some years ago. That made me go down a path of backing up the movies, and then backing up the movies and the bonus features, and then to wanting to back the discs up entirely, and perhaps even pay to back them up to the cloud in case something ever happened to my house and the backup server, and then maybe I also wanted some sort of a device to plug into the TV so that I could watch the backup as if it were the original disc, menus and all, and there are devices that will supposedly do this… but eventually I got to the point where this was all a lot of work, and maybe I don’t really need all of the bonus features available when I stream from my server when I’m on vacation or whatever, and maybe replacing the discs is a matter for my insurance policy.

So in the end, I settled for ripping the main feature, so I can watch it on-the-go, but the bonus features will require the disc itself.

[todo: how to store, organize, shelving ideas, etc.]

Backups of physical media

I have a rack-mount PC running windows that I use for most media backup purposes, mainly because it’s easier to take advantage of hardware acceleration on Windows, but also because it makes some media backup easier, since more tools are available on Windows.

I have both a Blu-ray drive and a DVD drive in this PC, and use MakeMKV to rip the discs and remove DRM. I can then use Handbrake to compress them a little further for easier streaming over WANs. I have presets that I use to take advantage of GPU acceleration in compressing the videos, and to make sure that audio and subtitle languages are included, so that I don’t end up with a useless file if I’m ripping a foreign film with no English track (or if it’s something where I would prefer the sub to the dub, which is most things for me).

Here are my Handbrake presets as JSON exports, which you can import from the Presets > Import from file menu selection.

The one called AppleTV SaS MKV v04 NVEnc is the one I use the most, as a default for movies. That one, however, presupposes that you have an Nvidia graphics card that will accelerate the compression. If you do not, either use the one without NVEnc (for “Nvidia Encoder”) at the end, or read up on the Handbrake documentation for whatever hardware encoder may be available to you. The other variants are:

  • DeInt which has the de-interlacing set up in a smart way that should remove it cleanly if it’s a standard film-to-video telecine pulldown (seen often on on DVDs, and even sometimes in old bonus features included on Blu-rays), and tries to do a smart deinterlace or field blend if it’s something weird
  • NOCROP which, as you might imagine, turns off attempting to auto-crop the image for letterboxed and pillar-boxed video — mainly because if there are mixed aspect ratios in, say, a bonus feature that mixes interviews and clips from the movie, Handbrake still does a terrible job of guessing the correct aspect ratio.

Organization

I use Plex Media Server to serve my movie files, so that I can watch them on the go.

Plex, for the most part, uses file names to determine metadata instead of embedded metadata, so I often find myself referencing these documentation pages for how to name the files:

Other members of your household can use the same account, and just be added as local users on your Plex server, or they can create their own free account at plex.tv and then you can share the library with them.

Backups of cloud media

Most of the digital movie and TV purchases I’ve made have been from Apple’s ecosystem, and I had good luck using TuneFab M4V Converter with iTunes on Windows to remove DRM and download those videos to a format that I could back up locally. You can then add those videos to your Plex server just like the physical media rips mentioned above.

For Amazon Prime Video purchases, I had good luck with PlayOn Home, which also allows you to download from several other services. However, it seems like they’re moving toward a subscription-based cloud offering and away from the buy-once “Home” version, so YMMV.

Music

Physical Media

CDs! uhhh… Tapes! Records! I feel like for me, CDs are the thing I’m most worried about. Tapes and records are definitely back-up-able, but as they’re not already digital, that’s a different beast. I am slowly getting back into using physical media more at home, but I sure do listen to a lot of music on my iPhone, and I want it available.

I still use iTunes to rip my CDs, and have it set to convert to Apple Lossless Audio Codec (ALAC) so it’s at best quality. I then add these files to Plex which does a pretty decent job of managing music.

CAVEAT: When I use Plex as a source for our Sonos system, there seems to be some sort of buffering problem playing back ALAC files, like the data rate is higher than it expects maybe? It’s a problem I haven’t fully resolved yet. However, if I use the Plex app on my phone to play, and then AirPlay to the Sonos speakers, it works totally fine, so at least there’s a workaround.

Plex has similar file naming restrictions for music as it does for video files, and renaming my files to meet their standards seemed to fix most of the weird half-album and duplicated album issues I had when I first moved over my iTunes library (which had done a better job of using the embedded metadata).

If you really want to digitize your analogue tapes and records (which I certainly have done), it’s just a matter of recording it to your computer with a decent USB audio interface, splitting the files to separate tracks, and then naming and sorting them all appropriately.

Books

Physical Media

Melvil Decimal System. Trust me, I’ve tried LCC and it’s a pain in the ass too. WorldCat is also useful for looking up where a book is classified in MDS/DDS if it’s missing in LibraryThing.

No, I Meant Backing Up Physical Media

Yeah, I went down this misguided path too. Sure there are book scanners and it is indeed possible, and maybe even a good idea if you have a lot of rare stuff, but… I guess be sure that’s actually something that you want to have take over your life and isn’t just, say, a book you occasionally want to read that you could just buy an ebook for. Speaking of eBooks…

Digital Media

eBooks! ePub! Mobi! ePub is the way to go for future-proofing, I think.

For Kindle books, Calibre seems like the best solution here. Add the DeDRM plugin and plug in your Kindle to move the files over, and convert them. If you need to deal with KFX format, you may need the KFX Input plug-in, but as it appears that Kindle is moving to ePub instead, that may no longer be a concern. Calibre can also convert your book to ePub from another format. Easy peasy. Lemon squeezy.

NOTE: DeDRM was dropped by the original developer, and a new developer picked it up, so if you have an old version that’s not working, perhaps check the more recent link above and see if it works for you.

For iBooks / Apple Books ebooks, they are already in ePub format, but with DRM. I have seen some decent reviews for ViWizard DRM iBook Copy for Mac (what a mouthful!), but it only works on macOS 10.12 Sierra or earlier. Requiem seems to have died. I haven’t used either of them myself, and so this remains an unresolved problem for me. If you have a better suggestion, or some success to report, leave a comment?

Organization

Plex doesn’t have any facility for books at all, so if you want a nice web interface , I recommend Calibre-Web. Setting up that server is too complicated to relate here, but if you search, there are plenty of installation guides for various server types, even putting it on a Synology NAS, which is how I do it.

Audiobooks

Physical media

Ripping CDs, as above, is one way for audiobooks to get into your digital library. Plex isn’t a great way to present these, though, as they just appear as Music libraries, and don’t have the features you might have come to expect from, say, Audible. Check the Organization section below for a solution.

Cloud media

For Audible, there is Libation, which can access your Audible library and download backup copies to your local drive.

Organization

Since Plex doesn’t have the greatest way of handling audiobooks, I have a self-hosted server with audiobookshelf running, and I have uploaded all of my audiobook backups there. There is a nice web interface with a player, and there are also beta versions of Android and iOS apps that connect directly to your personal server and allow audiobook playback on the go.

Related Tools

Mostly macOS-based, since despite my media ripping software being on Windows, I use Macs day to day for my personal life, and for doing the final organization work:

  • Name Mangler — When I have a wicked large number of files to rename, this tool does a great job of making complex renaming stuff easy, letting you apply multiple renaming steps to a single batch
  • Big Mean Folder Machine — It comes up less often in media management than it used to, but this app is great for sorting huge batches of files into smaller folders based on file names or metadata; you can even do a preview run to see what it would change
  • MusicBrainz Picard — awesome music file metadata editing, which is less useful if you’re using Plex as your server honestly, but still really nice for iTunes use and just generally having the satisfaction of cleaning up your dang metadata
  • The same guy who wrote the Calibre-web instructions above also has a whole slew of installation instructions for putting other useful things on Synology NASes and is definitely worth checking out

Reverse proxy a domain to a Docker container on Synology NAS DSM

This is more to remind myself of how to do it — it may not be 100% complete, or exactly fit your needs!

I’m going to assume that you have the Docker package installed, and a Docker container running on the Synology NAS, serving http content on a port that is not 80 or 443. (Setting up this container is beyond the scope of this doc.)

First, have the FQDN ready. We’ll use books.example.com. Make sure that your DNS provider is pointing this domain at your NAS server. If you need to know the NAS’s IP address, check DSM > Control Panel > External Access > DDNS and check the External Address under the preferred Service Provider. (I use DynDNS.org.)

NOTE: There doesn’t seem to be a way to set multiple domain names to resolve to one IP address with DynDNS.org, but I wonder if there is a way to do it with the customized query URL method? Worth looking into.

In the Docker package, click on Container in the left column, and in the list of containers, click on the container that you want to proxy. click on Details and in the lower left, under Port Settings, make note of the Local Port for the web service. In this case, the port is 5471.

In Control Panel, go to Login Portal > Advanced, and click the button for Reverse Proxy. This will show you a list of any proxies you have set up. Click Create and enter the following information:

  • Reverse Proxy Name: a descriptive name. I’m proxying the Kavita ebook server, so we’ll call this “Kavita”
  • Source
    • Protocol: HTTPS (we will set up the certificate in a moment)
    • Hostname: books.example.com
    • Port: 443 (the common HTTPS port)
    • ☑️ Enable HSTS (this redirects and HTTP requests to HTTPS)
  • Destination
    • Protocol: HTTP (this is local on a (supposedly) trusted machine, so we don’t need security, pls certificates on a local machine are a pain in the ass)
    • Hostname: localhost
    • Port: 5471 (the Local Port from above)

Limit Handbrake CPU usage under Windows

I’ve recently transitioned to using a PC for all of my media transcoding and hosting Plex, so I can keep my Macs unburdened and ready for real work. The only thing is — when Handbrake is compressing something, it pegs all of my CPU cores at 100%, leaving not much left for Plex Media Server to use.

I found a great solution on this page at Windows Loop. I’ll let you go there for all of the details, but I’ll post an abbreviated version here, just in case that site disappears someday:

Lower Priority

Go to Handbrake > Tools > Preferences > Advanced, and set Priority Level to Below Normal or Low. I chose Low.

You can also do this from Task Manager: In the Details tab, right-click on Handbrake.exe and Set Priority.

I also set Plex Media Server to High priority here, for good measure.

CPU Affinity

From Task Manager, when you right-click, one of the choices is Set Affinity. This will allow you to set which CPU cores the app is allowed to run on. I unchecked cores 0 and 1, so on my processor, it still has access to the six other cores.

I find this lets the system stay responsive, and hope that this will make it able to serve Plex media without any trouble, even while I’m transcoding media.

SSL Certificates in Python 3.6

Note to self: After installing Python 3.6 on your Mac, run /Applications/Python 3.6/Install Certificates.command so your SLL connections don’t fail.

The error you might get, when this is the case, is:

[crayon-64cc43bdc79c8057828516/]

Python 3.6 no longer links to the macOS-supplied SSL libraries and now includes its own copy of OpenSSL, but it doesn’t automatically install the root certificates needed to validate connections. It seems the Python 3.6 installer warns you about this during the install, but it’s easy to miss. It’s also in the README, and there’s a behavior bug for Python suggesting that it get installed automatically. Thanks to this Stack Overflow post for the help.

A snippet of the macOS Server documentation about web apps

Reverse Proxy with macOS Server

Visualize this outcome:

  1. site1.example.com -> my single public IP -> Port forwarding 80 and 443 to LAN 192.168.1.10, a Mac mini running Apple macOS Server 5.3 on macOS 10.12 Sierra.
  2. site2.example.com -> my single public IP -> LAN 192.168.1.10 -> reverse proxy? -> :80 and :443 on LAN 192.168.1.15, another Mac mini running GitLab CE on Ubuntu 16.04.

This is on a network where I have no option of adding another public IP.

#1 is already up and running fine.

#2 is the hard part, mainly because I’m running macOS Server.app on #1, and the proxy setup does not seem to be the relatively straight-forward Apache one. Server has the Apache config files in odd places, and it likes to overwrite them with new changes made in the GUI, so it’s taken me a while to figure out the “right” way to do this under Server.app.

Enter Web Apps

I first had this question two years ago, and a friend of mine suggested there might be a way to do it with OS X Server’s webappctl command and writing an appropriate webapp.plist, though the Work with web apps section of the OS X Server docs contains almost no detail. The docs have been updated to cover Server 5.3, but the web app documentation is still very sparse.

This new answer below is written as of macOS Server 5.3. Server 5 overhauls things in that every service in Server is now behind one master reverse proxy, so these instructions will not work with Server 4.1. However, these instructions are adapted and clarified from the instructions found at precursor.ca’s R.A.I.S page (scroll down to the “macOS Server 5 Reverse Proxy” tutorial link). Their tutorial also includes historical instructions for doing this with Server 4.1. However, since their tutorial focuses more on running multiple services from the same Mac instead of proxying to a separate machine, I’ve re-written the instructions to clarify that below.

Configuration Files

Note that in all of the files, you will need to replace the LAN IP addresses, and site2 and the other example domain and file names with the names of your own proxied domain. There are several occurrences within each configuration file.

Make a web app configuration file on the macOS Server machine, in /Library/Server/Web/Config/apache2/httpd_site2webapp.conf, pointing at the IP address of the site2 server.

[crayon-64cc702fe8ac8325377293/]

Then in /Library/Server/Web/Config/apache2/webapps/com.example.site2webapp.plist, add the following, referencing the location of the .conf file above:

[crayon-64cc702fe8ad2759004965/]

If you will also need SSL, put the following in /Library/Server/Web/Config/apache2/httpd_site2SSLwebapp.conf. The config differs in that LAN traffic between the servers will be unencrypted by default (this config essentially tells Server not to check if there is a valid cert), but the WAN traffic will be encrypted. I believe you can install a self-signed certificate on the site2 server for encrypted local traffic, but this config will still enable the reverse proxy without having to have matching certificates. (I grant there is likely a more correct way to secure the local traffic, but this worked for me.)

[crayon-64cc702fe8ad5722095209/]

And the corresponding SSL web app plist, /Library/Server/Web/Config/apache2/webapps/com.example.site2SSLwebapp.plist, much the same as above:

[crayon-64cc702fe8ada817177898/]

For each of these four files, the permissions need to be owner: root and group: wheel, 644:

[crayon-64cc702fe8adc887911679/]

Setting up Server.app

Add the web app to Websites

  • In the Websites tab of the Server.app interface, click the + below the Websites listing to add a new site
  • Enter site2.example.com for Domain Name
  • Leave everything else at the default settings
  • Click Edit Advanced Settings…
  • Under the section “Make these web apps available on this website:” check Enable for site2WebApp
  • Click OK
  • Click Create

SSL

If you need SSL on the WAN, install a certificate in Server that covers the new domain. I used Let’s Encrypt to create a single certificate that was good for both my site1 and site2 domains. (Here’s my Let’s Encrypt instructions for getting a cert while using Server.app.)

  • In the Certificates tab of Server.app, click the + at the bottom of the window, then Import a Certificate Identity…
  • Drag-and-drop the .pem files you got back from Let’s Encrypt (or whatever certificate files you have), and click Import
  • In the Websites tab, create the new site almost the same as before, except change the Port to 443 and under SSL Certificate, pick the cert you just imported
  • Under Edit Advanced Settings…, instead check Enable for site2SSLWebApp

It just works!1


  1. Finally. 

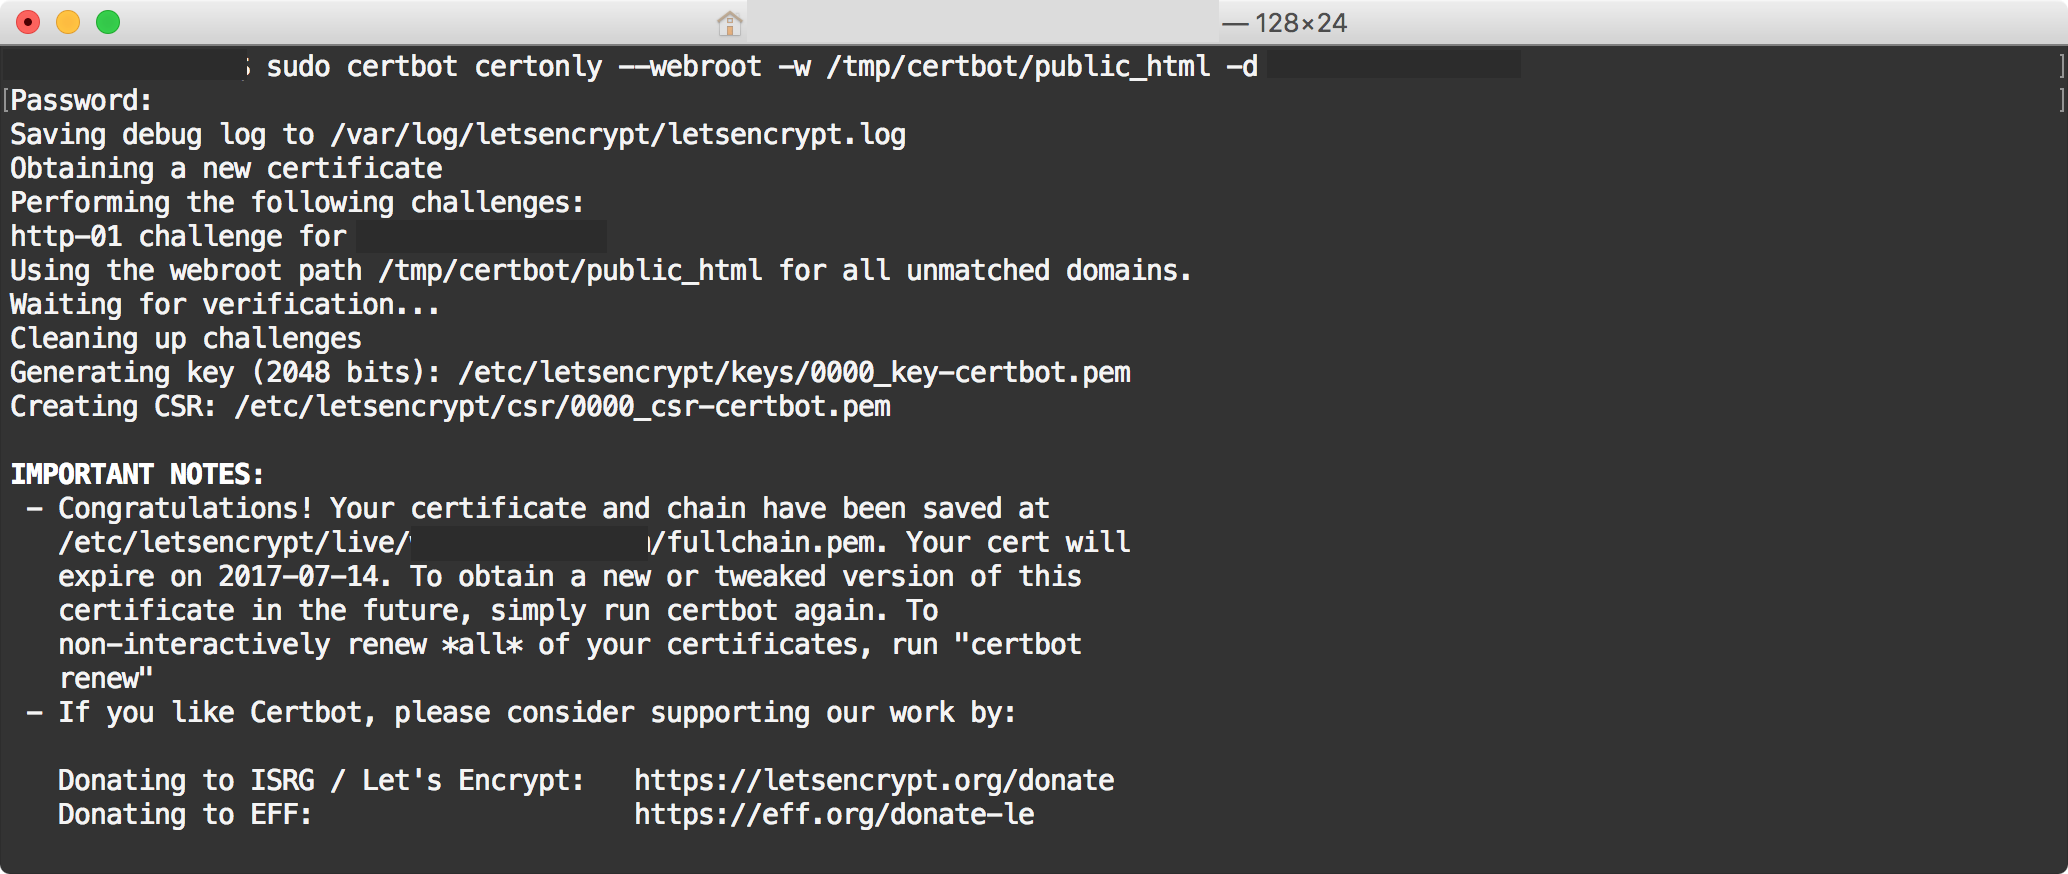
Installing a Let’s Encrypt Certificate on macOS Server

I have had a hell of a time finding a way to install a Let’s Encrypt certificate on macOS Server the Right Way™, due to how Server customizes the Apache config in weird and annoying ways.

For the moment, I am going to use this way to “trick” certbot into issuing the cert to a different server temporarily running on the same machine. Adapted from the very helpful instructions at Denis Gladkikh’s blog.